Posted on

Should you take the sides off a marquee in strong winds?

Demystifying Marquee Wind Resistance: Sides On vs. Sides Off

Contrary to a prevailing misconception, a marquee stands more resilient against the wind when its sides are firmly in place rather than left off. The notion that removing the sides allows wind to harmlessly pass through doesn’t hold water, and I’ll elucidate why.

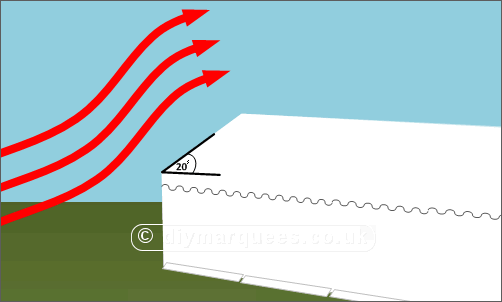
Wind Dynamics: The illustrative diagram depicts how wind interacts with a marquee, revealing that wind entering the marquee accumulates and lifts the roof. The most effective strategy to counter this phenomenon is to position the sides facing the wind and secure the marquee steadfastly.

It’s crucial to note that this discussion pertains to strong winds, not extreme weather conditions. Marquees should never be left standing in conditions of an extreme nature.

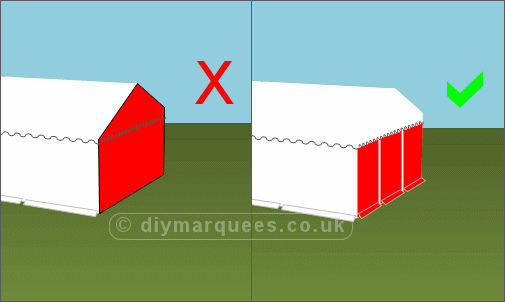
Debunking the Myth: Some advocate for side removal in strong winds, believing it alleviates the situation. However, this approach introduces two critical factors.

i. Wind Buildup Under the Roof: Even with one side off, wind still accumulates beneath the marquee roof. Visualize walking across a windy field with an umbrella – removing the sides turns your marquee into a vast, wind-catching umbrella.

ii. Lift Creation by Wind Passing Through: Wind passing through the open side creates lift as it travels over or through the marquee roof. The wind’s increased speed over the roof mirrors the principles behind lift generation, akin to an airplane wing.

This revelation is not intended to instil fear but to dispel a prevailing myth. At Portland Marquees, we advocate best practices for marquee hire companies:

  1. Ensure robust anchoring using tie-down kits at a minimum.
  2. Keep walls on sides likely to face strong winds, positioning the entrance on a different side.
  3. Never remove all sides in strong winds.
  4. Understand the marquee’s limitations – in rare instances of extreme weather warnings, prioritize dismantling.

Thank you for delving into this clarification. We value and welcome your feedback.

Posted on

Stiching VS welding in marquee panels


Unveiling the Truth: Marquee Fabric Joining Methods

In an industry sometimes overshadowed by exaggerated claims, we at Portland Marquees believe in a positive and evidence-based approach to our marquee design, steering clear of extravagant statements lacking substantiation.

Embarking on a series of Reality Check articles, we shed light on the pros and cons, allowing readers to discern the rationale behind our marquee design choices:

Stitching: In the realm of marquee fabrication, two methods reign supreme: stitching and welding. Delving into stitching, an antiquated technique often claimed to be fool-proof, we unveil the truth.

Back in the ’80s, the King family pioneered wax-proof clothing alongside marquee manufacturing. While waxed cotton seamlessly integrated the stitching for waterproofing, the same doesn’t hold for man-made fabrics like PVC, PE, poly/PVC, or nylon used in marquee roofs. Unlike breathable clothing with taped seams, stitching in marquees becomes a gateway for water to seep through or foster mould between PVC layers.

Dismiss notions claiming stitched seams don’t leak but are a result of condensation. In reality, condensation in marquees primarily forms on the metal framework, debunking such assertions.

Welding: Contrastingly, high-frequency welding epitomizes a technique akin to melting the layers together, creating a seamless, waterproof bond stronger than the original material.

Consider the analogy of inflatable structures. Stitched inflatables require constant inflation due to air loss through stitch holes, while welded inflatables remain airtight, allowing them to stay inflated without continuous intervention.

Conclusion: When confronted with a marquee roof labeled ‘commercial’ but stitched together, exercise caution. Unless the joins boast multiple overlaps akin to traditional canvas tents, the marquee may not meet the necessary standards and should be reconsidered.

Thank you for delving into the nuances of marquee fabrication with us.

For tailored event advice, connect with us and share event specifics. We thrive on assisting you in making informed decisions.

For permissions or licensing regarding any part of this article, feel free to reach out to us.

Posted on

Marquee envelope roofs are stronger


Revolutionizing Marquee Design: Embracing the Envelope Style

At the heart of all our DIY Marquee ranges lies the innovative envelope style roof, setting them apart with superior strength and flexibility when compared to the conventional carport style.

The integration of the gable into the roof design not only establishes a fixed angle but also contributes significantly to bolstering the structural integrity of the marquee. This ingenious approach essentially introduces an extra brace at the marquee’s end, enhancing stability through tensioning across each end.

The heightened flexibility is a key attribute, facilitated by the roof dropping down to the same eave height, allowing for the seamless interchangeability of side panels.

Not only does the envelope roof design offer enhanced functionality, but it is also acclaimed for its aesthetic appeal, especially when employed as a roof-only structure. Say goodbye to the unrefined look of a mere “tarpaulin thrown over,” as one of our customers candidly remarked about a carport-style party tent from elsewhere.

Admittedly, the envelope design incurs a slightly higher manufacturing cost, but we firmly believe that the advantages it brings far outweigh the marginal increase in production expenses.

For personalized event insights, don’t hesitate to reach out to us. Share event specifics, including the type, available space, number of guests, and site diagrams or photographs, and we’ll gladly offer tailored guidance.

If you wish to use or quote any segment of this article, please reach out to us for permission or licensing.

Posted on

20° marquee roofs are more wind-resistant

Optimizing Marquee Roof Angles for Durability

In the realm of large commercial marquees, the prevalence of a 20-degree angle for pitched roofs is notable. This translates to a 1m rise on 6m wide structures (2m leg = 3m apex height, 2.3m leg = 3.3m apex height) and a 1.5m rise on 9m wide structures (2.3m leg = 3.8m apex height).

While the manufacturing cost of a 20-degree angled roof may be slightly higher compared to a 30-degree roof, it is a deliberate choice for its enhanced wind resistance.

As the roof angle increases, the marquee’s ridge elevates, expanding the roof’s surface area. Simultaneously, the forces exerted on the roof increase exponentially. In essence, doubling the roof height quadruples the forces it must withstand.

The principle is clear: lower apex heights contribute to greater wind resistance in a structure.

In regions like Britain, where rain is a common challenge, the industry’s extensive experience has identified a 20-degree roof as the most durable solution against the prevalent wind and rain conditions.

It’s worth noting that smaller structures (3m or 4m wide) may fare better with 30-degree roofs, especially when supplemented with additional roof braces to fortify the framework.

For personalized event advice, feel free to reach out to us. Share event details such as the type, available space, number of guests, and site diagrams or photographs, and we’ll provide tailored guidance.

If you intend to use or quote any section of this article, please contact us for permission or licensing.

Posted on

2m end panels are more wind-resistant


Enhancing Marquee End Panels for Wind Resistance

Strong winds pose a challenge for the end panels of a marquee, and the choice of panel configuration plays a crucial role in withstanding these forces.

When a single large end panel is used, all the force generated by strong winds is concentrated on the eyelets around the edge. Furthermore, a single large panel tends to have more slack, allowing it to billow in and out excessively.

In practical terms, this can lead to premature wear and tear on the end panels, not living up to the expected durability.

A more effective approach involves using multiple panels to cover the end of the marquee. This distribution of wind forces makes individual end panels more resilient and wind-resistant. Additionally, the use of smaller panels results in reduced billowing compared to a single large panel.

It’s noteworthy that smaller end panels are incorporated throughout our commercial, professional, and deluxe marquee ranges, ensuring improved performance in challenging weather conditions.

For personalized advice tailored to your event, feel free to reach out to us. Provide event details, such as the type, available space, number of guests, and site diagrams or photographs, and we will guide you through your options.

If you intend to use or quote any portion of this article, kindly contact us for permission or licensing.

Posted on

Marquee Linings explained

Decoding Marquee Lining Terminology: A Guide to Interior Elegance

Understanding the terminology associated with marquee linings is generally straightforward, with a few industry-specific nuances to consider:

  1. Roof Linings:
    • Flat or Shaped: Follows the interior space in the roof, a popular and contemporary choice.
    • Pleated: Vertically gathered material, fashionable in the 90s and 2000s.
    • Rouched: Horizontally tucked linings, trendy in the 80s and 90s.
  2. Eave Linings:
    • Swags: Gathered material, a favorite for weddings, often in ivory but available in various colors.
    • Flat Pelmet: A flat 10cm drop around the marquee, commonly paired with flat or shaped linings.
    • Gathered Pelmet: Similar to a flat pelmet but with a slight pleat, more popular in the 90s.
    • Scalloped Pelmet with Gold Tassel Fringe: Traditionally associated with rouched linings, now considered out of fashion.
  3. Curtain Linings:
    • Used to conceal metal legs; they essentially act as leg covers and typically do not cover window panels. Professional hirers or suppliers avoid linings covering window panels due to the pattern shining through, which detracts from a polished finish.
  4. Wall Linings:
    • Not depicted in the photograph due to the use of a window. These linings hide wall panels and are placed on the interior to match the marquee’s aesthetic. While basic ranges may position walls only at the ends, advanced commercial marquees allow for wall panels anywhere inside.

For a personalized touch to your event, we are ready to provide tailored advice. Simply contact us with details about your event, such as the type, available space, number of guests, and site diagrams or photographs, and we will gladly assist you in making informed choices.

If you wish to use or quote any part of this article, kindly reach out to us for permission or licensing.

Posted on

Marquee dance floors

Marquee ivory flat linings
Black and white dance floor


Deciding on Dance Floors for Your Marquee: Exploring Options

The cost of hiring a marquee typically ranges between one-third and half of the purchase price. Consequently, if you anticipate using a marquee more than once, purchasing may prove to be a more economical choice than hiring. However, dance floors and furniture differ in their hire charges, often amounting to around a tenth of the purchase price. Additionally, dance floors are commonly heavier than the marquees they occupy, making hiring a popular and practical solution.

Dance floors come in three common finishes: plain wooden (usually stained plywood), parquet (interlocking wooden blocks), or black & white (square acrylic panels akin to a chessboard).

For those who already own their marquee, here are some considerations:

  1. Hiring a Dance Floor:
    • Economically, hiring is more viable unless you plan to use the dance floor 10 or more times.
    • Most hire companies, whether specialized in furniture or marquees, typically handle the setup and removal of the dance floor, a convenience given their considerable weight.
    • Dance floor boards can occupy more storage space than the marquee itself, making hiring a practical storage solution.
  2. Buying a Dance Floor:
    • Information on reputable dance floor manufacturers, widely used by the marquee hire industry, can be provided upon request. These manufacturers offer durable and reliable dance floors requiring minimal maintenance.
    • It’s advisable to steer clear of cheap plastic interlocking tiles, as they rarely achieve a pleasing aesthetic and may not withstand the rigors that dance floors face. Quality comes at a price, making this the more expensive option.
  3. Making a Dance Floor:
    • Crafting a standard wooden dance floor is a straightforward project. Utilize 18mm plywood with battens securely screwed on the back, and use clips or screws to secure each panel.
    • Staining the plywood with wood stain or painting allows for customization of the finish.
    • Consider cutting large boards in half (e.g., 8×4 down to 8×2) for ease of transport and storage.
    • Costing the project in advance is essential; while buying plywood from a wholesaler is competitive, purchasing a new boarded tent floor may be more economical if buying from retail stores like B & Q.

When planning your event and considering a dance floor for your marquee, we are ready to provide personalized advice. Contact us with event details such as the type of event, available space, number of guests, and site diagrams or photographs, and we will gladly guide you through your options.

For any usage or quoting of parts of this article, please reach out to us for permission or licensing.

Posted on

How to get power to your marquee


Powering a Marquee: Different Approaches

When it comes to supplying power to a marquee, there are generally three methods to consider:

1. Extension Leads:

  • Check the extension lead’s maximum loading capacity (typically 3KW) to avoid overloading.
  • Tidy up the extension lead by securing excess cable to the eaves rail of the marquee using cable ties.
  • Avoid running extension leads in areas where tripping hazards may occur. Ideally, run them out of the side of the marquee above head height, securing them to a fence or hedge and then down to the house.
  • If using multiple extension leads, plug them into different circuits of the house.
  • If the marquee is a significant distance from an available power source (30m+), consider employing an electrician for a temporary supply or using a generator.
  • Ensure any electrical supply is protected by earth leakage circuit breakers to guard against accidental damage.

2. Temporary Circuits (Electrician Required):

  • Engage a certified electrician registered for Part P.
  • Confirm the power output of the circuit to ensure it meets the marquee’s power requirements, considering caterers, entertainment, bar, and lighting.
  • Specify that the power will terminate with standard 13amp sockets in the marquee.
  • Ask the electrician to run the cable in a suitable location to prevent trip hazards.
  • Like with extension leads, ensure any electricity supply is protected by earth leakage circuit breakers.

3. Generators:

  • Opt for ‘super-silent’ generators for minimal noise disruption.
  • Consult the generator hire company to determine the appropriate size based on your total power requirements.
  • Confirm that the generator hire includes cabling to the marquee with termination in standard 13amp sockets.
  • Position the generator at a convenient distance from the marquee.
  • Have spare fuel (usually diesel) available, and ensure the tank is full before the event starts.
  • As with other power sources, ensure any electricity supply is protected by earth leakage circuit breakers.

For personalized advice tailored to your event, feel free to contact us with event details such as type, available space, number of guests, and site diagrams or photographs. We are here to guide you through the options.

If you intend to use or quote any portion of this article, kindly reach out to us for permission or licensing.

Posted on

How to connect marquees using a gutter

Three 6x12m marquees guttered side to side


Understanding Marquee Gutters:

In the realm of marquees, gutters take the form of PVC strips adorned with eyelets on each side, typically measuring 30 to 60cm in width. Ensuring the gutter extends at least 1 meter beyond the marquee join is essential, and having additional length proves advantageous in preventing the ground beneath the marquee from succumbing to excessive moisture.

Attempting to extend a gutter by joining two separate pieces is not a straightforward task and requires specialized PVC welding equipment, a capability integral to the production of our marquee gutters.

Affixing guttering to the marquee involves the use of cable ties. It is crucial to avoid the use of bungee loops for guttering, as they may succumb to the weight of water, causing the gutter to sag and potentially leading to calamitous outcomes during your event. If your gutter purchase includes bungee loops, it is advisable to question the expertise and competence of your supplier.

Note: On the flip side, the use of cable ties for connecting exterior PVC components, such as roof and side panels, is discouraged. Bungee loops allow for flexibility in material during strong winds, thereby mitigating strain on the eyelets.

Key Considerations When Installing a Marquee Gutter:

  1. Ensure the gutter is devoid of kinks.
  2. Verify a consistent fall over the marquee’s length, devoid of any dips.
  3. Always conduct a hosepipe test to ascertain proper water flow, ensuring it exits the gutter without pooling.

Steps for Guttering Between Two Marquees:

  1. Raise both marquees, maintaining a 10cm gap between them. Postpone the installation of flooring, lining, or lighting until the marquee join is weatherproof.
  2. Thread the gutter between pairs of legs along the join, allowing an equal overhang at each end.
  3. Initiate cable tying from the middle of one marquee towards the eave rail, drawing the gutter taut towards one side. Progress to the end and replicate for the opposite side before shifting to the second marquee.
  4. For side-by-side marquees, adjust cable tie tension less towards each end on level ground or uniformly on sloped terrain.
  5. Repeat the process for the second marquee, ensuring a taut gutter to prevent kinks.
  6. Validate the installation by directing a hosepipe onto one marquee’s roof, ensuring effective water drainage.

Additional Considerations:

  • For end-to-end marquee arrangements, securely fasten legs together, drape the gutter over the join, and tension it down on both sides to stave off water ingress.
  • When weathering the end of one marquee to the side of another, construct an eave rail with ropes, securing a second rope from the middle to the apex to prevent sagging.
  • Address potential kinks at the gutter’s end by strategic tucking and secure fastening with a rope.
  • With practice, the process of weathering marquees together becomes second nature.

For tailored event advice, connect with us, providing pertinent event details. If you plan to use or quote segments of this article, kindly seek permission or licensing from us.

For personalized event advice, contact us with event details. If you wish to use or quote any part of this article, please seek permission or licensing from us.

Posted on

How to heat your marquee


As the seasons shift into spring and summer, heating in marquees is generally needed only to take off the evening chill. However, as autumn and winter set in, ensuring a warm marquee is essential for a successful event. Here are some dos and don’ts to consider:


Do:

Use a Heater with a Powerful Fan (Indirect Heaters are Best):

Indirect heaters, with their robust fans, are particularly effective.

Test Heating in Advance:

Test the heating system several days before the event, at the same time of day, to ensure it works efficiently and is adequate for the space.

Start Heating Well Before Guests Arrive in Winter:

In winter, have the heating on for at least an hour before guests arrive. A warm welcome upon arrival sets the tone for the entire function.

Direct Heaters Toward the Entrance:

Aim the heating ducts towards the entrance, creating a welcoming wall of warmth for guests upon entry.

Fit Carbon Monoxide Testers:

Install carbon monoxide testers, placing one for every heater, to ensure safety.


Don’t:

Use Inadequate Heaters:

Avoid halogen heaters, cabinet heaters, or other infra-red heaters without fans, as they may lack the power required for larger marquees.

Place Objects Near Heaters:

Keep anything from being close to or touching a heater, prioritizing safety.

Opt for LPG Blower/Space Heaters:

While blower or space heaters can heat large areas quickly, their use is discouraged due to potential risks:

They require well-ventilated spaces, and sealed marquees can pose a risk of ‘re-burning’ air, leading to carbon monoxide production.

The naked flame inside, protected only by a grill, may not be safe, especially for small children.

Overlook Carbon Monoxide Risks:

Understand the risks associated with certain heaters, especially those involving open flames.


Heating Options:

Ducted Heaters:

Require gas bottles and sit outside the marquee, ducting warm air into the space. Generally include thermostats for ease of use.

Indirect Heaters:

Powered by oil/diesel, these heaters are effective in rapidly heating large spaces. Similar to ducted heaters, they sit outside the marquee with warm air ducted in.

Marquee heaters for sale
Indirect marquee diesel heater

Considerations for Heater Choice:

Ducted heaters can be expensive, and hiring is often recommended.

Indirect heaters, while effective, may warrant purchasing if planning to use them frequently.

For personalized event advice or more information, please contact us with details about your event. If you intend to use or quote any part of this article, please reach out to us for permission or licensing.